
I spent 30 years behind the wheel of an 18-wheeler and I have seen flag setups that lasted three seasons and ones that shredded inside of a week. The difference almost always comes down to two things: the quality of the hardware and whether the driver took 20 minutes to set it up correctly the first time. If you are staring at a Ricco House flag pole kit sitting on your bunk right now, or thinking about ordering one, this is the walkthrough I wish somebody had handed me back when I first wanted to fly Old Glory on my Kenworth.
The Ricco House kit ships with a 5-foot tangle-free flagpole, a 3x5 embroidered American flag, a mount bracket, and the hardware to put it all together. No need to source parts separately and hope they play nice with each other. Everything is matched from the factory. The install takes about 20 minutes at a truck stop if you know what you are doing, and about 40 minutes the first time you do it. Either way, no drilling is required.
Want the kit that is already matched and ready to mount? The Ricco House set ships fast and skips the parts-hunting.
The Ricco House Flag Pole Kit includes the 5-foot tangle-free pole, a 3x5 embroidered American flag, and all the mounting hardware. Rated 4.4 stars across more than 1,200 buyer reviews.
Amazon Check Today's Price on Amazon →Step 1: Inventory the Box Before You Start
Before you touch a wrench, dump everything out of the box and check it against the packing list. The Ricco House kit should have the lower pole section, the upper pole section with the tangle-free swivel built in, the flag itself with its brass grommets, the base mount bracket, two locking set screws, and a small bag of hardware. If anything is missing, contact the seller before you start modifying the bracket or cutting anything. I have seen guys crack open a kit, eyeball it, and start bolting. Then they are 10 minutes in and missing a set screw with their hands covered in grease. Take two minutes to count the parts first.
Also check the flag at this stage. Run your finger along the stitching on all four edges. On the Ricco House flag, the embroidery on the stars should be tight and raised, not flat-printed. The grommets should be brass-colored, not silver, and they should be seated flush with no gap between the grommet ring and the canvas header. If you see a loose grommet out of the box, swap the flag now, not after you have driven 400 miles.

Step 2: Choose Your Mount Location on the Rig
Most owner-operators mount the flagpole at the rear of the cab or on the frame rail just behind the cab doors. On a standard day cab the rear-of-cab position keeps the flag visible from behind and avoids mirror interference. On a sleeper, some guys prefer the driver-side frame rail about six feet back from the cab because it gets the flag clear of the exhaust stacks. Whatever you choose, the mount bracket needs a flat metal surface at least a quarter-inch thick, or a receiver tube that accepts a two-inch insert if your rig has a hitch receiver back there.
Avoid mounting directly to the trailer. Trailers get swapped and the DOT has rules about what equipment can be attached. Keep the flagpole on the tractor side. Also think about weigh stations and low-clearance docks. A five-foot pole standing straight up adds height. If your route has low bridges or covered loading docks under 14 feet, pick a mount that allows you to angle the pole back to about 45 degrees or remove it in under a minute. The Ricco House bracket has an adjustable angle, which is one of the things I like about it.

Step 3: Secure the Base Mount Bracket
If you are using a receiver hitch, slide the mount insert into the two-inch receiver tube and tighten the hitch pin or locking bolt finger-tight first, then bring it up snug with a half-inch socket. Do not gorilla it. The Ricco House bracket is steel but the set screws can strip if you over-torque. Snug plus a quarter turn is enough. Give the bracket a firm shake from side to side and front to back. It should not wiggle at all. If it moves, the flag will oscillate at highway speed and work the mount loose inside 500 miles.
If you are mounting to a flat frame rail surface without a receiver, use the provided clamp hardware and position the bracket so the pole will angle back slightly, around 10 to 15 degrees from vertical. That slight rearward angle lets the flag stream back rather than flutter forward against the pole. Put a rubber gasket or a piece of inner tube scrap between the clamp and the truck's metal to dampen vibration. Road vibration at 65mph is the number one reason mounts work themselves loose over time, and a vibration dampener costs you nothing.

Step 4: Assemble and Seat the Flagpole
The Ricco House pole comes in two sections. The lower section slides into the base mount and locks with the set screw. The upper section threads into the top of the lower section. Hand-tighten first, then use the small wrench in the hardware bag to snug the connection. The tangle-free swivel is built into the top of the upper section. Do not disassemble the swivel. It is factory set and over-tightening or taking it apart will kill the spin function, which is the whole point of the design. The swivel is what keeps the flag from wrapping around the pole at speed.
Once the pole is assembled and seated, stand back and sight down it from behind the truck. It should be plumb or angled slightly rearward. If it leans to the left or right, loosen the mount set screw, adjust the bracket orientation, and re-tighten. A pole that sits even five degrees off-center will pull the flag to one side and put uneven stress on the grommets. I have seen flags with one grommet torn out and the other intact, which tells me the pole was mounted crooked. Fix it now before the flag takes the punishment.
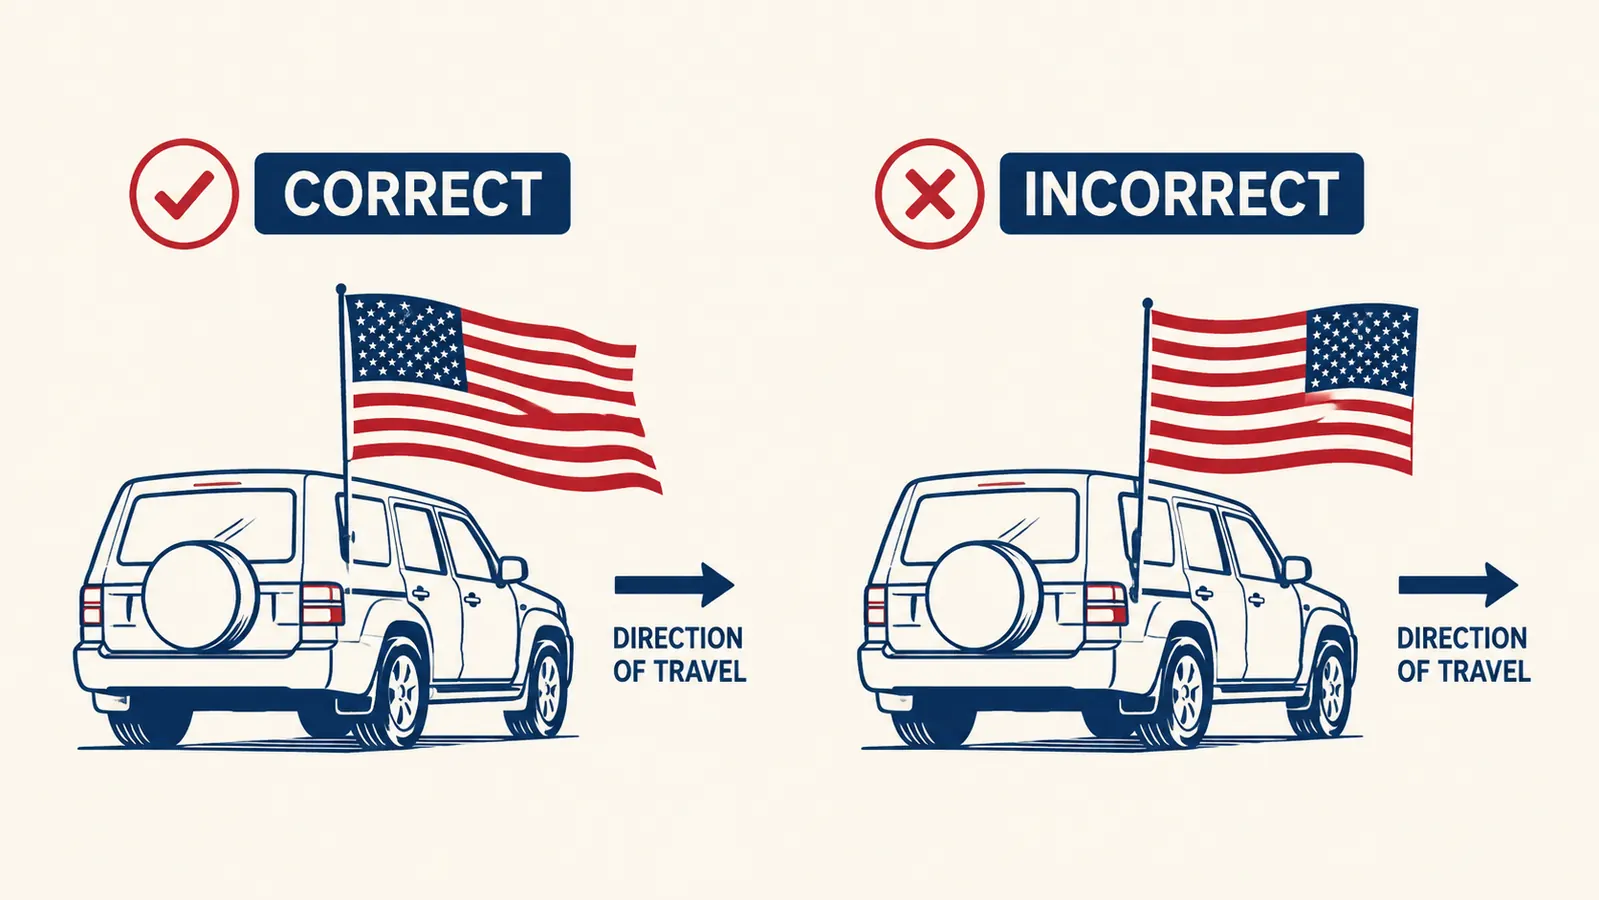
Step 5: Attach the Flag Correctly and Do a Highway-Speed Check
This is where a lot of drivers get it wrong. The American flag on a vehicle should have the union, meaning the blue field with the stars, positioned at the observer's left as the vehicle moves forward. That means when you look at the driver side of your rig from outside, the stars should be on the front-facing side of the flag, toward the cab. When you look at the passenger side, the stars are also toward the front. If the stars are trailing toward the rear on both sides, the flag is oriented backwards. It is not just an etiquette issue. The Flag Code is specific about vehicle display. Take the 30 seconds to get it right.
To attach the flag, clip the top grommet to the swivel hook at the top of the pole, then clip the bottom grommet to the lower attachment point on the pole shaft. The flag should hang with a slight drape when the truck is stopped. Once you are moving at highway speed, the flag will extend out behind the pole. The tangle-free swivel allows the flag to rotate with wind direction changes so it does not wrap. If you notice the flag tangling after a few miles, stop and check that the swivel is not seized. A drop of light machine oil on the swivel pin solves that 90 percent of the time.
After you get back on the highway, do a visual check in your mirrors at about 30 miles. Pull over at the next safe spot and physically check the mount bracket, the pole connections, and the grommet clips. Everything tightens differently once road vibration starts working through the metal. Snug anything that moved. After that first 30-mile check, you will likely not need to tighten again for several thousand miles.
What Else Helps
A few things that separate a setup that lasts years from one that lasts weeks. First, UV protectant spray on the flag fabric. The Ricco House flag is embroidered polyester with good color retention built in, but a light coat of Scotchgard or any outdoor fabric protectant adds another season of fade resistance. Do it once, let it dry, and you are good. Second, bring the flag inside when you park for more than 48 hours in one spot, especially in winter. It is not required, but constant exposure to ice and hard freezes accelerates grommet wear. Third, carry one spare set screw in your toolbox. They are the size of your thumbnail, cost about 30 cents, and losing one at 2 a.m. on I-80 is a headache you do not need. Fourth, if you swap trailers frequently, consider a quick-release mount so you can pull the flagpole in under 60 seconds without digging out tools. Some mount designs support a spring-loaded pin release. The Ricco House bracket is bolt-on but the adjustment wing nut loosens fast enough for most weigh station stops.
The tangle-free swivel does the work. Your job is to make sure the mount is solid. Get those two things right and the flag will outlast the pole.
Ready to put Old Glory on your rig the right way? The Ricco House kit gives you the pole, the flag, and the hardware in one shot.
The Ricco House Flag Pole Kit is a matched set: 5-foot tangle-free flagpole plus a 3x5 embroidered American flag. Everything in the box, nothing to hunt down separately. Over 1,200 truckers have bought this setup.
Amazon Check Today's Price on Amazon →